Getting Started - Outlets
This step covers how to send messages to GUI controls, to alter their appearance, change selection state, and so forth. It assumes that you've already completed the previous steps, and builds on information found in them.
Preliminaries
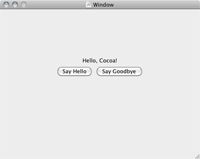
Start by creating a new "Perl->Cocoa Application" project. Then add a text field and two buttons to the main window. Set the buttons' titles to "Say Hello" and "Say Goodbye," and connect them to Perl methods that use the NSLog() function to print the indicated output to the console. The details of doing all that were covered in previous HowTos, so they're not repeated here.
This HowTo will outline how to print the output to the text label, instead of just sending it to the console.
1. Create an outlet for the label
Adding an outlet to your controller is similar to adding an action. Open MainWindow.xib in Interface Builder, and select the "Hello Controller" object. Then, press cmd-opt-right to show its class definition in the Library panel. Select "Outlets" in the drop-down menu, and use the "+" button to add a new one. The rest of this tutorial assumes that you've named the outlet "textLabel".
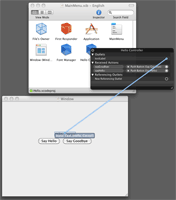
You also need to connect the outlet to an object. Again, this is similar to connecting an object's action to a controller. You begin by right-clicking on the "Hello Controller" object, however, and drag from its "textLabel" outlet to the label control. This is unlike action connections, which are dragged in the opposite direction, from the object to the controller.
2. Create the Perl code for the outlet
In HelloController.pm, you'll find a section of code that exports the HelloController class to the Objective-C run time. It declares the class' super class, and its properties. Every outlet is a property, but not all properties are outlets. A property can also be a simple instance variable, or accessed through Cocoa Bindings. But that's for later. Here's what the code looks like:
class HelloController {
    'super' => 'NSObject',
    'properties' => [
                    ],
};
As this implies, no properties are defined by default. Declare a new property, and name it "textLabel". This will serve as the business end of the connection you created above. The code should now look like this:
class HelloController {
    'super' => 'NSObject',
    'properties' => [
        'textLabel',
                    ],
};
The declaration above will create two accessor methods, if the current class does not already have them, called "textLabel" and "setTextLabel". It will also make them available to be called from Cocoa. When the NIB is loaded below, Cocoa's NIB loading machinery will call "setTextLabel" to make the connection.
3. Modify the sayHello and sayGoodbye methods
If you followed the instructions above, you should already have two Perl methods that respond to action messages sent by the two buttons, and each should have a call to the NSLog() function to send output to the console. For example, the "sayHello" method should look something like this:
sub sayHello : Selector(sayHello:) IBAction {
    NSLog("Hello");
}
Add a line of code at the beginning of the method to retrieve the $self and $sender parameters. If you don't know what $self is, this would be a great time to read Tom Christiansen's excellent OO tutorial, found in the perltoot POD document. $sender is a reference to the GUI widget that sent the "sayHello" message.
The textLabel widget that you created in Interface Builder is an instance of the NSTextField class. NSTextField, like most GUI widget classes, is a subclass of NSControl, and inherits the "setStringValue:" method from that class. Instance methods are called for GUI widgets by treating the outlets connected to them as object references. So, the "sayHello" method should now look like this:
sub sayHello : Selector(sayHello:) IBAction {
    my ($self, $sender) = @_;
    $self->textLabel()->setStringValue("Hello, Cocoa!");
}
Repeat the above, making similar changes to the sayGoodbye method as well.
4. Build and run your app
As always, the last step is to build and run your application. If you correctly followed all of the steps above, clicking on the buttons should change the text displayed in the text label widget.
If clicking on a button generates a "can't call method setStringValue on an undefined value" error, make certain that the outlet is correctly defined and connected to the GUI widget in Interface Builder.
5. Working with $sender
As mentioned above, $sender is a reference to the GUI widget that generated the action message being responded to. You can use $sender to work with that widget, just as if you'd created an outlet and connected it to that widget. To help illustrate this, rename the "sayHello" method from above to "saySomething." Do the same in Interface Builder, renaming the "sayHello" action to "saySomething," and connect both buttons to the "saySomething" action.
The NSButton class has a "title" method that returns the button's label, and you can use this method to determine which button was clicked, or even use the title directly to produce an output message, as in the following example. (This example assumes that you've given the two buttons the titles suggested above: "Say Hello" and "Say Goodbye".)
sub saySomething : Selector(saySomething:) IBAction {
    my ($self, $sender) = @_;

    my $output = $sender->title();
    $output =~ s/Say //;

    $self->textLabel()->setStringValue($output);
}


