Getting Started - Responding to Events
Events are at the heart of GUI programming. Every Cocoa application has an "event loop" that repeatedly looks for incoming events such as mouse clicks, menu selections, and key strokes, and dispatches the corresponding events to your application. A great deal of your application code - possibly even all of it - will be contained in methods that are called in response to these events.
This page will show you how to create a controller class, add an event handler method to it, and create an instance of it in Interface Builder. You'll add a button to your application's main window and connect it to the event handler method, which will respond to the event by writing a message to the console. (We'll display the message in a GUI element in the next lesson - one thing at a time for now.) If you've already done the previous "Hello World!" HowTo, you can keep using that; if not, begin by creating a new Cocoa-Perl application project in Xcode.
This page continues from where the previous "Hello, Cocoa!" page stopped, and assumes you're using the same project, so we won't repeat those steps.
1. Add a button to the main window
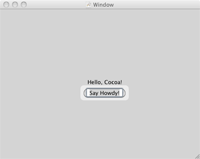
Open the MainWindow.nib in Interface Builder. In the "Library" panel, choose the Cocoa -> Views & Cells -> Buttons group of controls, and drag a button onto the main window. If you want, double-click the button to change its title. You can also change the title in the Info panel, which you can open with cmd-shift-I.
2. Create a controller class
Still in Interface Builder, switch to the "Classes" pane in the "Library" panel, and select the "NSObject" class. Open the "Gear" menu at the bottom left of the panel, and choose the first item, titled "New Subclass..." Enter the name of your new controller class in the dialog that appears - I'll use "HelloController" for this tutorial. Since IB does not know about Perl source, make sure the "Generate source files" checkbox is clear before proceeding.
The "HelloController" class will now appear in the class list, and selecting it should show that it inherits from NSObject.
2. Create an action to handle button clicks
In Interface Builder's "Library" panel, select your "HelloController" class, then select "Actions" in the drop-down menu in the bottom half of the panel. Since it's a brand-new class and inherits from NSObject, it has no built-in actions. You'll need to create one to handle the button click. To do that, click the "+" icon below the (empty) list of actions. That will add a new row to the list, and allow you to edit the action name. Let's call this one "sayHello". (Note that IB automatically renames it to "sayHello:" when you're finished editing - this is normal, so don't panic.)
3. Instantiate a controller object
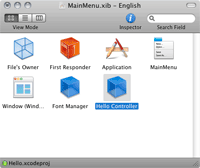
To create a new instance of your controller class, simply drag it from the class list at the top half of Interface Builder's "Library" panel, to the "MainMenu.nib" document window.
4. Create the connection from the button to the action
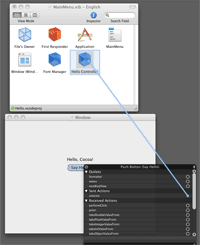
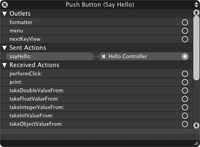
Now, right-click (or ctrl-click) on the button you added earlier, to show its inspector panel. In that panel, you'll see a section titled "Sent Actions", with a single item shown; that item is titled "selector", because it hasn't yet been connected to an action method. To make the connection, drag from that item's target (the circle at the right) to the controller object in the document window.
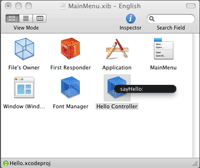
After you've finished the drag and drop, a popup will appear over the controller icon, listing all of its action methods. Choose "sayHello:" from the list.
5. Verify the connection
Now that the connection has been established, right-click (or ctrl-click) on the button to show its inspector panel again. It will now show the name of the action message that will be sent, and the object to which it will be sent.
If it looks good, save your work and exit from Interface Builder - it's time to write some code!
6. Create a controller class - again
No, that's not a typo! The above steps in Interface Builder didn't actually create a new class; instead, they told Interface Builder about the class and its action methods. Essentially, you're promising that the class will be available when the interface is loaded at run time. Now, it's time to fulfill that promise and implement the class by writing some Perl code.
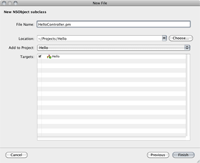
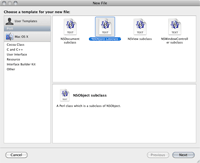
In Xcode, right click on the "Classes" group, and choose "Add -> New File..." from the popup menu. A dialog will appear, asking you to choose a template with which to create the new file. Select the "NSObject subclass" template from the "Perl" section, then enter its name in the next dialog: "HelloController".
In your project's "Other Sources" group, you'll find a "main.pl" file. As its name implies, this is where everything begins. So, you need to add an additional "use" statement that will cause your HelloController class to be compiled and ready for use when your application's interface is loaded. It should read as follows:
use CamelBones qw(:All);
use HelloController;
The file templates included with CamelBones 1.1.0 contain a typo. The import tag in the "use CamelBones" statement is ":all", with a lowercase "A", instead of ":All", with a capital "A". If you're using this version of CamelBones, clicking "Build and Run" at this point will produce an error; the message sent to Xcode's console says:
"all" is not defined in %CamelBones::EXPORT_TAGS at
[...]/Hello.app/Contents/Resources/HelloController.pm line 12
If your app crashes with this error, examine your newly-created class closely, and be sure that the ":All" export tag is correctly capitalized, as shown above.
7. Create a Perl method to handle the action
CamelBones uses a lesser-known feature of Perl - method attributes - to provide information about Perl methods to the Objective-C run time. A Selector() attribute, as its name implies, is used to indicate what Objectie-C selector a Perl method will respond to. Giving the method a name that closely resembles the selector is usually a good idea, but it's not required. For this method, we'll also use an IBAction attribute to indicate that the method accepts a single object as its argument and does not return a value, as is expected of methods that handle actions sent from Interface Builder. (Additional attributes can be used to indicate other argument and/or return types, but those are beyond the scope of this tutorial.)
# Handle the sayHello: action
sub sayHello : Selector(sayHello:) IBAction {
    NSLog("Hello, world!");
}
Note: the NSLog() function is a Cocoa function that sends output to the console, similar to Perl's own print() function.
Save the HelloController.pm file, and click Xcode's "Build and Run" button. The "Hello World!" message printed by the NSLog() function should appear in Xcode's console, which you can view with cmd-shift-R, or by choosing the "Run -> Console" menu item. If you run your application outside of Xcode, the output will appear in the console log, which you can use "Console.app" to view.

