Getting Started - Menu Events
For this tutorial, I'll assume you've been following along with the whole "Getting Started" series. In that case, you'll have already have created a Hello project in Xcode. I'll also assume that you've created "Say Hello" and "Say Goodbye" buttons, connected them to the saySomething() method in your controller class, and used an outlet in those methods to alter the contents of a text label.
This page describes how to add "Say Hello" and "Say Goodbye" menu items to the MainMenu.xib using Interface Builder, and how to connect it to the Responder Chain so that they're handled by the methods you've already added to your HelloController class.
Adding a submenu
Open MainMenu.xib in Interface Builder, and select the "Objects" pane in the Library panel. If you'd like, you can select "Library -> Cocoa -> Application -> Menus" in the drop-down menu; that will reduce the number of objects shown in the scrolling list down to a manageable number. Drag a "Submenu Menu Item" to the menu and drop it into place, in between the "View" and "Window" menus.
You might want to experiment with this a little bit, as the static screen shots shown here can only do so much to give you the feel of it. One important thing to note is that when you drop the new submenu, its position will be determined by where it was dropped within the menu that is selected when you drop it.
This is illustrated by one of the screen shots: The cursor is pointing to the left half of the "Window" menu. So, after that drop is completed, the new menu will appear after the "Edit" menu and before the "Window" menu, which is shown in its expanded state.
Renaming the submenu and its item
When first dropped into place, the submenu is titled "Submenu", and it has a single item under it named "Item". Naturally you'll want to change these titles to something more appropriate.
To retitle the submenu, double-click its title text to make it editable, and simply enter the new title text. I suggest giving the new submenu a title something like "Speak". To retitle a menu item, expand the parent menu first, then double-click the menu item and edit the title text. Let's call this one "Say Hello".
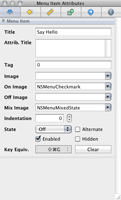
As an alternative, you can also retitle a submenu or menu item by selecting it, choosing the "Attributes" pane in Interface Builder's "Info" panel, and editing the "Title" box that appears in that.
Adding menu items
Adding a new menu item is similar to adding a submenu. Just drag a "Item" item from the "Cocoa Menus" pane, and drop it where you want it to appear. A thin blue line will be shown while you're dragging it over an existing menu, to show will it will appear when dropped.
Go ahead and add a new item to your "Speak" menu now, and retitle it to "Say Goodbye".
Assigning keyboard shortcuts
Many, or perhaps most menu items have keyboard shortcuts. I've known power users who use these to the extent that referring to them as "shortcuts" isn't really all that accurate; to some, they are the primary interface to menu items. To assign a shortcut to your new menu items, first select the menu item. Then, define the shortcut key and modifiers it should use in the "Attributes" pane of Interface Builder's "Info" panel.
Try it out - set keyboard shortcuts for your new menu items. I suggest cmd-shift-H for "Say Hello", and cmd-shift-G for "Say Goodbye".
Making the connection
This is very similar to how you connected the button actions in the "Responding to Events" tutorial, so I'll leave out most of the detail. The major difference is that, instead of connecting actions to your HelloController object, you'll connect them to the "First Responder" object instead.
As in that tutorial, right-click on the menu item to show its inspector panel. Then, drag the connection from the "selector" connector to the "First Responder" icon, and select the "saySomething:" action.
You should connect both "Say Hello" and "Say Goodbye" menu items to the "saySomething:" action. If you've been following along through these tutorials, you should have already implemented the Perl method to handle this action in HelloController.pm, in the earlier "Outlets" tutorial, so there's no more code to write.
Setting the delegate
If you build and run your application at this point, you'll notice something odd - the menu items you just created are present, but they're disabled. Why is that? Remember, actions that are connected to the First Responder are sent to the The Responder Chain, which means that a number of objects are checked to see if they respond to the specified action. The Responder Chain is also examined when menus are expanded, and if none of the objects in the chain respond to the action that's defined for a menu item, that item is automatically disabled.
So, we need to add the window controller object to the Responder Chain. As you might recall, the Key and Main Windows' delegates are part of the chain. So, what you want to do is tell the Window object to treat your window controller object as its delegate. In IB, right-click the "Window" object to show its inspector panel, then drag from its "delegate" connector to the "HelloController" object.


